Custom Full Width Closet Organizer
Most bedrooms only have one closet. And it's usually not a big closet. So why not make the best possible storage solution? Do it once, and do it right.
I love wall to wall closet organization. Not only does it maximize storage and organization, but it looks better. A tailored fit is clean and simple, with no distracting gaps. And you don't have to block out the ends for closet rods.
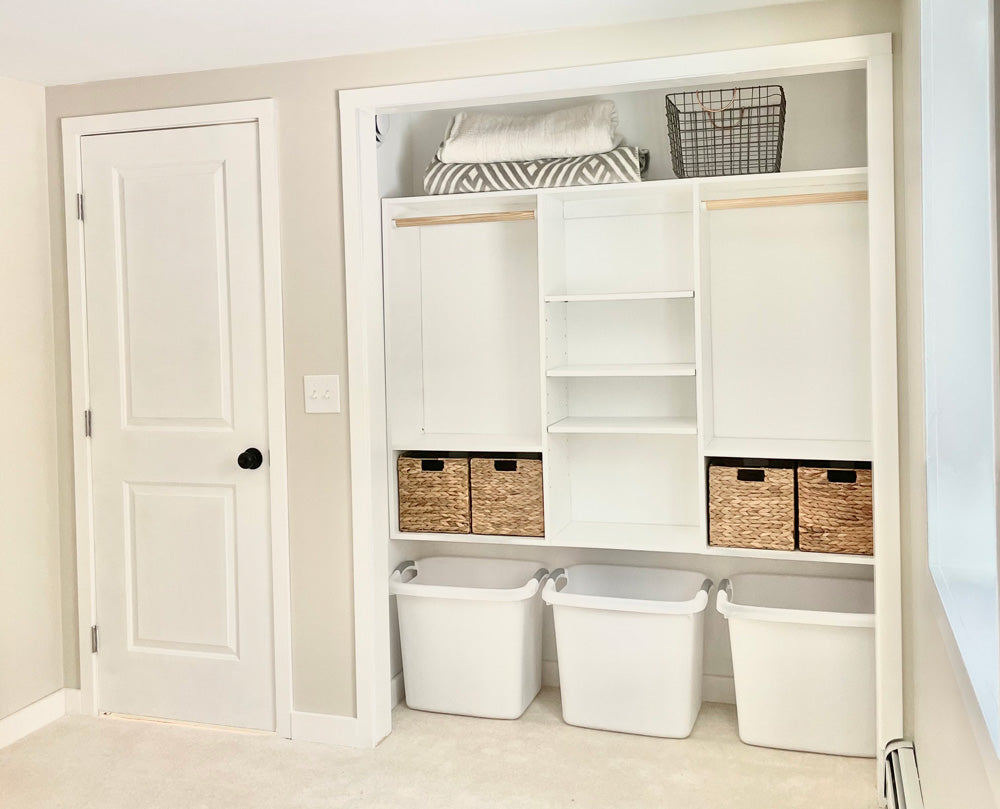
I just finished up this closet (above) and we couldn't be happier with the results. Not only is it custom fit, without odd blocking on the walls for the rods to hang on, but it is custom designed for a children's bedroom with toy storage on the floor, easy to access milk crates for socks, underwear, pajamas, and plenty of shelving space for folded pants and t-shirts. We also included hanging space for nicer shirts, sweaters, and dresses. And finally, the top shelf is available for out of season, too big hand-me-downs, and extra sheets and blankets.
We love that it is made with 3/4" thick PureBond plywood (from Shelf Help) - so it won't fall apart, doesn't off-gas formaldehyde, and is repairable, repaintable and repurposeable. The cost of the pieces for this closet was right at $170. Adding in paint, hardware, and the 1x3 bay supports, and this closet cost about $200. It's a good deal for a great long term solution.
Materials and Tools
- Shelf Help Carcass Kit 11.25" deep x 48" tall x width of your closet interior minus 2"
- 1 - 1x3 in the total width of your closet interior
- Pocket Hole Jig set on 3/4" setting with 1-1/4" pocket hole screws
- Optional Shelf Pins for adjustable shelves and Shelf Pin Jig
- 3" wood screws (self tapping star bit recommended) for hanging on walls and matching bit
- Drill
- Level and Stud Finder (for hanging in the closet)
- Tape Measure
- Paint or Stain and suitable finishing tools for desired finish
Designing a Kids Closet
This closet is designed with a younger child in mind, but with adjustable shelves, can be reconfigured easily for an older teen.
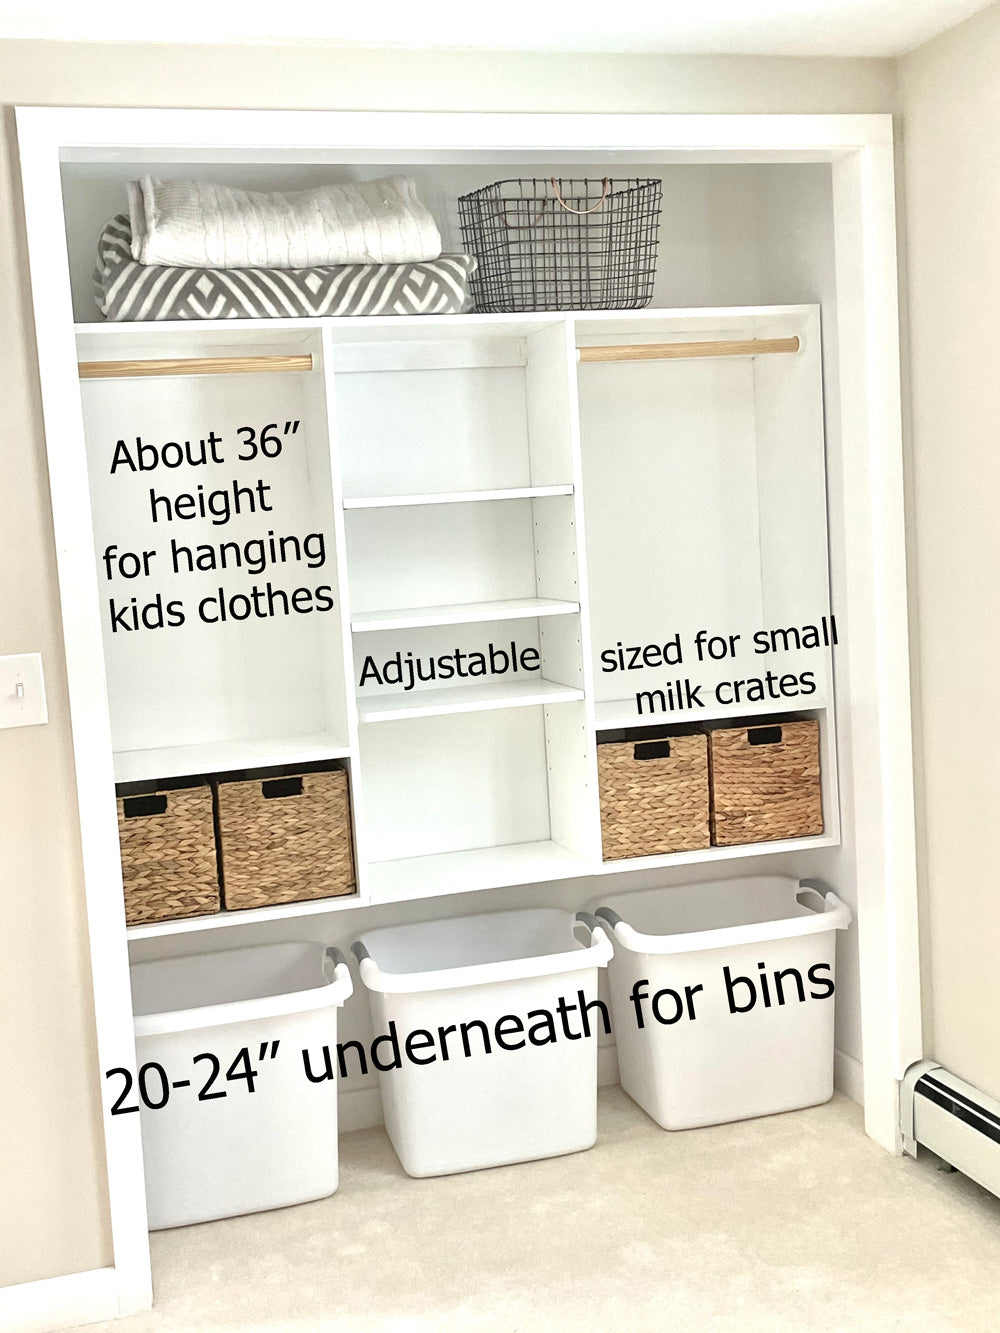
- Appropriate Sizing: Since children's clothes are smaller, you don't need as much shelving space. Hanging areas can be shortened, since kids clothes are usually shorter, so we added the milk crates under the hanging bars (that can be removed later)
- Toys Too: But you also need toy storage. My solution was to raise the closet about 24" off the floor, to allow for bin storage on the floor. This will make it easy for kids to put away toys.
- User Friendly-ness: Notice that the clothing area (since adults will do most of the clothing placing) is at an adult easy to reach height. The toy storage is at a child's easy to reach height.
The goal is to design a closet that has adequate storage and easy for the user to use. A good closet system should keep a bedroom tidy.
Configuring the Perfect Closet
So you know what you need, now is the fun part! With no math, you can figure it all out using our free Shelf Configurator.

Here's the configuration I used:
- Depth = 11.25"
- Height = 48"
- Width = Inside width of closet minus about 1"
- Bays = 3 - you may need more or less bays depending on your closet width. Make sure shelf spans are between 12" (to prevent hard to access and build shelves) and 36" (to prevent sagging shelves)
The two outer bays I sized to fit standard milk crates. I do suggest leaving out the shelves on top of the milk crates - they will just be in the way of accessing the milk crates. And when your child grows (and clothes get longer), you can just remove the milk crates.
The middle shelves are all adjustable.
Building the Closet Organizer
Please watch the video of the build steps for this closet here.
Carcass pieces can be ordered through Shelf Help configurator (click on the COMPLETE tab in the configurator) or you can cut your own by downloading the drawings (also through the COMPLETE tab).
Once you have your carcass pieces cut and front edges finished, simply build the two outside towers with 3/4" pocket holes and 1-1/4" pocket hole screws.

For the middle pieces, also attach the top shelf to a same sized bay support. The bottom shelf of the middle should be drilled with pocket holes for attaching on final assembly.
Paint or stain the closet pieces.
Place inside the closet and attach middle top and bottom to the two outer towers.
Hang the organizer about 24" off the floor through the back cleats into studs in the wall.
Add closet rods and shelf pins for adjustable shelves.
We love how this closet turned out and can't wait to see photos of your closet transformations! Please share a photo if you use this tutorial on our Instagram @shelfhelpnow or send a photo to photos@shelfhelpnow.com